Export Data Tool
The Export Data Tool is available as a tool in Results View (Image). It may be used to output time-series of different kinds of data as columns in a text file. All data that are availbale as time-series, are available to be exported using this tool, including data from the log file (e.g Force).
- To open: In menubar click Tools ⟶ Export Data
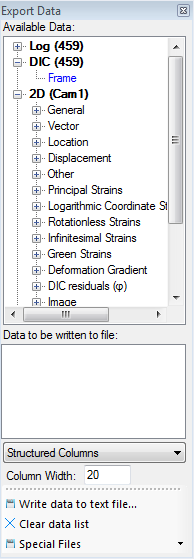
In the tree-view labelled Available Data, you may find the data types available for exportion to text files.
Under the root node labelled Log, the variables from the assoiciated log file may be found. This requires that a log-file is defined in the current DIC input file (see DIC Input File Editor).
The DIC root node currently only holds the Frame Id.
For a 2D-DIC analysis, you will have a root node called 2D (Cam1). From here, all results from the 2D-DIC analysis may be collected.
For a 3D-DIC analysis, you will have two additional root nodes labelled 2D (Cam2) and 3D.
- To add a specific data type to a text-file, right-click on the data type you want to add, then select Add Data to List. The added data type will be shown in the listbox below. Multiple data type may be added to a single file.
- When all desired data types are added, press the Write Data to Text File-button. You will be asked for the location of the text file before it is saved to disk.
The different data types may have varying requirements:
Strains: Requires that at least on element is selected in the corresponding view. For each selected element, a column will appear in the text file.
Vector Data: Requires at least a single defined vector in the view. For each selected vector, a column will appear in the text file.
Node Data (location, displacement, etc..): Requires at least a single selected node in the view. For each selected node, a column will appear in the text file.
Hint
By default, the code outputs a single column of data per selected item (element, node or vector). It is however possible to optain a single column in the text file, containing the average value for all selected items: Right-click on the added data in the listbox labelled Data to be Written to File, and choose Mark as Average. A star sign (*) will appear in front of the data-type text, indicating that this data type should be outputted as an average time series.